The aroma of browned, crispy chicken strips, glistening with a tangy sauce - this is Chicken Strips, a cornerstone of American comfort food, originating from the Midwest United States in the mid-20th century. Its defining characteristic is a perfectly achieved textural duality: a shatteringly crisp exterior yielding to a juicy, tender interior. The key to this transformation lies in the precise control of heat and the careful manipulation of protein denaturation, a process fundamentally driven by Maillard reactions and the coagulation of collagen - the protein responsible for chicken's firmness.
Complete Recipe Overview
| Property | Detail |
|---|---|
| Dish entity | Chicken Strips |
| Cuisine origin | Midwestern United States, 1950s |
| Defining technique | Pan-frying with precise temperature control |
| Hero ingredients | Chicken Breast, Cornstarch, All-Purpose Flour |
| Critical ratio | Starch:Protein - approximately 2:1, ensuring a robust crust and tender interior. |
| Prep time | 20 minutes |
| Cook time | 12-15 minutes at 180°C |
| Rest / chill time | 5 minutes |
| Yield | 4 servings |
| Difficulty | Medium - requires attention to detail and temperature monitoring. |
Ingredients: Quantities, Roles, and Critical Ratios
The success of chicken strips hinges on a carefully balanced ingredient list. Let's break down the roles of each component:
- Chicken Breast (800g) - Role: Provides the protein base. Chicken breast, particularly when sourced from younger birds, has a relatively low collagen content, making it ideal for achieving a crispy exterior without becoming overly rubbery.
- Cornstarch (60g) - Role: Creates a thick, glossy coating that promotes rapid browning and a shatteringly crisp crust. Cornstarch's high starch content absorbs moisture and forms a protective barrier during frying.
- All-Purpose Flour (60g) - Role: Adds structure to the coating and contributes to the initial browning.
- Eggs (2 large) - Role: Acts as a binder, adhering the coating to the chicken and adding richness.
- Milk (60ml) - Role: Tenderizes the chicken slightly and adds moisture to the egg wash, creating a smoother coating.
- Paprika (15g) - Role: Adds color and a subtle smoky flavor.
- Garlic Powder (5g) - Role: Enhances the savory flavor profile.
- Salt (2g) - Role: Seasoning.
- Black Pepper (1g) - Role: Seasoning.
- Vegetable Oil (150ml) - Role: Provides a medium-heat cooking surface.
The critical ratio here is the starch to protein - approximately 2:1. Too much starch and the coating will be overly thick and gummy; too little and the crust won't be as crisp. A slightly higher ratio of flour to starch contributes to a more robust initial browning.
The Science of Cornstarch and Flour
Cornstarch and flour are both starches, but they behave differently when heated. Cornstarch, being a fine powder, has a significantly larger surface area than flour. This increased surface area allows it to absorb water rapidly, creating a gel-like structure when heated. This gel traps moisture on the surface of the chicken, preventing it from evaporating during frying and contributing to the formation of a crispy crust. Flour, with its coarser texture, doesn't absorb water as quickly, resulting in a less pronounced effect on crust formation. The Maillard reaction, a complex chemical reaction between amino acids and reducing sugars, is accelerated by the moisture trapped by the cornstarch, leading to the characteristic browning and flavor development. The gluten network formed by flour provides structural integrity to the coating, holding it together during frying and contributing to the overall texture.
Method: Pan-frying at Every Critical Stage
The goal of this method is to achieve a uniformly browned and crispy exterior while maintaining a juicy interior through precise temperature control and careful monitoring.
- Prepare the Chicken - 5 minutes: Cut 800g chicken breast into strips approximately 1.5cm thick. Pat completely dry with paper towels - moisture is the enemy of crispness. Season generously with salt and pepper.
- Prepare the Coating - 5 minutes: In a shallow dish, whisk together 60g cornstarch, 60g flour, 15g paprika, 5g garlic powder, and 2g salt. In a separate shallow dish, whisk together 2 eggs and 60ml milk.
- Dredge the Chicken - 5 minutes: Dip each chicken strip first into the egg wash, ensuring it's fully coated. Then, dredge thoroughly in the cornstarch mixture, pressing gently to ensure the coating adheres evenly.
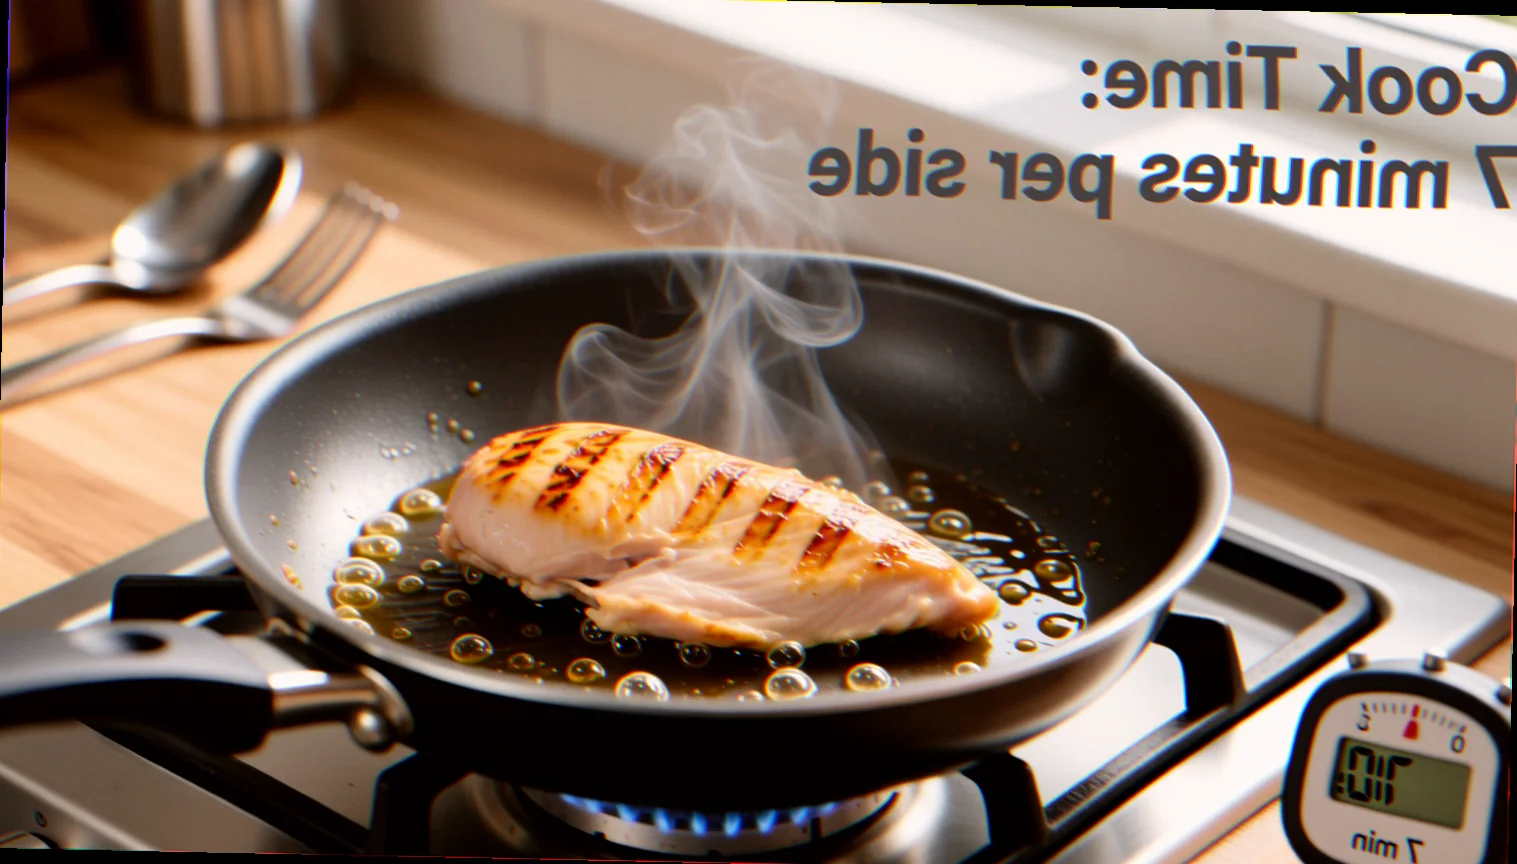
- Heat the Oil - 5 minutes: Pour 150ml vegetable oil into a large skillet. Heat over medium-high heat until the oil reaches 180°C - use a thermometer to ensure accuracy. Critical Control Point 1: Oil temperature is paramount. Too low, and the chicken will steam instead of fry, resulting in a soggy crust. Too high, and the exterior will burn before the interior is cooked.
- Fry the Chicken - 8-10 minutes: Carefully place the coated chicken strips into the hot oil, ensuring not to overcrowd the pan. Fry for 4-5 minutes per side, until golden brown and cooked through. Internal temperature should reach 74°C. Critical Control Point 2: Overcrowding the pan will lower the oil temperature, leading to uneven cooking and a soggy crust.
- Rest - 5 minutes: Remove the chicken strips from the skillet and place them on a wire rack to drain excess oil. Allow to rest for 5 minutes before serving. Rest/Set - 5 minutes: Resting allows the juices to redistribute throughout the chicken, resulting in a more tender and flavorful product.
- Plate and Serve: Arrange the chicken strips on a platter and serve immediately.
Cultural and Historical Context of American Chicken Strips
Chicken strips emerged in the United States during the 1950s, a period of rapid suburbanization and the rise of convenience foods. Initially, they were a simple, home-style dish - chicken cutlets dredged in flour and fried. The modern iteration, with its thicker coating and often served with a sweet and tangy sauce, gained popularity in the 1980s, largely thanks to fast-food chains like McDonald's. The dish's accessibility and affordability cemented its place as a quintessential American comfort food, reflecting a desire for quick, satisfying meals. Regional variations have emerged, with some areas favoring a lighter coating and a more rustic presentation, while others embrace a bolder, more intensely flavored approach.
Variations Across Culinary Regions
- Southern US - 'Fried Chicken': This version typically uses buttermilk in the egg wash, resulting in a tangier flavor and a slightly denser coating. It's often served with mashed potatoes and gravy.
- New England - 'Chicken Parm' Inspired: A thicker coating is used, and the chicken is often baked after frying, topped with marinara sauce and mozzarella cheese. This variation leans into Italian-American influences.
- Vegan Adaptation: Substitute the chicken with firm tofu, pressed to remove excess water. Use a flaxseed 'egg' (1 tbsp flaxseed meal mixed with 3 tbsp water) as a binder.
- Modern Adaptation: Air frying chicken strips offers a significantly healthier alternative, achieving a crispy exterior with considerably less oil. However, the texture is slightly different - less shatteringly crisp than pan-fried strips.
Storage, Freezing, and Reheating Chicken Strips
Room Temperature: Chicken strips can be stored in an airtight container at room temperature for up to 2 hours. Reheating: Reheat in a 180°C oven for 5-7 minutes, or until heated through. Texture: The texture will soften slightly upon reheating. Refrigerator Storage: Chicken strips can be stored in an airtight container in the refrigerator for up to 3 days. Reheating: Reheat in the oven at 160°C for 10-15 minutes, or until heated through. Texture: The crust will lose some of its crispness. Freezer Storage: Chicken strips can be frozen for up to 3 months. Wrap tightly in plastic wrap and then in a freezer bag. Reheating: Thaw completely in the refrigerator. Reheat in the oven at 175°C for 20-25 minutes, or until heated through. Texture: The crust will be noticeably softer after freezing and thawing, but still palatable.
Pairing Chicken Strips: Sides, Sauces, and Drinks
Chicken strips pair exceptionally well with classic American sides like mashed potatoes and gravy, coleslaw, and french fries. A tangy barbecue sauce complements the savory flavor of the chicken perfectly. Alternatively, a creamy ranch dressing adds a cool and refreshing contrast. For a beverage pairing, a crisp, dry lager or a light-bodied IPA provides a balanced counterpoint to the richness of the chicken and sauce. A sweet iced tea also works well, offering a refreshing contrast to the savory dish.
Answers to the Most-Searched Questions About How long to cook chicken strips on stove
What temperature should chicken strips be cooked at - and how do I know it's done?
Chicken strips should be cooked at 180°C until the internal temperature reaches 74°C and the exterior is golden brown. Use a meat thermometer to ensure accuracy.
What is the difference between How long to cook chicken strips on stove and baking chicken strips?
Pan-frying results in a significantly crispier exterior due to direct contact with hot oil, while baking produces a softer, more evenly cooked result. The texture is the primary difference.
Can How long to cook chicken strips on stove be made in advance, and does it freeze well?
Yes, chicken strips can be made in advance and frozen. Freeze them wrapped tightly for up to 3 months. Reheating from frozen will result in a slightly softer crust, but the flavor will remain excellent.